APC™ Flash-Free Adhesive Side-By-Side Clinical Bonding Video
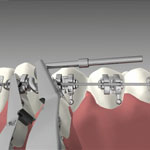
It is recommended to debond Clarity™ ADVANCED Ceramic Brackets on the archwire. However, single brackets may be debonded off the archwire. The Unitek™ Self-Ligating Bracket Debonding Instrument (REF 804-170) is recommended for debonding Clarity ADVANCED Ceramic Brackets, both on- and off the archwire, since it is specifically designed to maximize the ease of debonding. To debond, position the instrument over the bracket, firmly squeeze the bracket mesial-distal, to utilize the proprietary vertical stress concentrator, and gently rock the instrument back and forth, until the bracket is off the tooth.
It is recommended to debond Clarity™ ADVANCED Ceramic Brackets on the archwire. However, single brackets may be debonded off the archwire. The Unitek™ Self-Ligating Bracket Debonding Instrument (REF 804-170) is recommended for debonding Clarity ADVANCED Ceramic Brackets, both on- and off the archwire, since it is specifically designed to maximize the ease of debonding. To debond, position the instrument over the bracket, firmly squeeze the bracket mesial-distal, to utilize the proprietary vertical stress concentrator, and gently rock the instrument back and forth, until the bracket is off the tooth.
Tools: Hemostat/Mosquito pliers and ligature director with a small head
Ligature material: Sections of four modules of powerchain (not too thick; can use Rocky Mountain or Ormco)
When to use it: Use the reverse double overtie when you need maximum seating force on the wire.
Technique: Ligature is placed around the hook and the behind the occlusal wing before placing the wire. In contrast to a normal double overtie, the free modules are oriented to the occlusal. To overtie, seat the wire in the slot with a ligature director, stretch the elastic with the hemostat/mosquito pliers over the wire and fix the first module under the hook, using the ligature director to direct the powerchain. To remove the reverse double overtie, use a short dental explorer to pull the ligature from under the hook and remove.
Tools: Hemostat/Mosquito pliers and ligature director with a small head (optional)
Ligature material: Conventional o-ring
When to use it: When alignment is almost normal. This ligature will not provide tip control when used with the vertical slot.
Technique: Place o-ring behind the occlusal tie wing and over the gingival hook. When ligating lower anterior brackets, it is important to go occlusal to gingival when placing regular o-rings.
Tools: Hemostat/Mosquito pliers and ligature director
Ligature material: Multiple modules of clear powerchain
When to use it: To derotate and close spaces. The term “chicane” refers to an elastic that is placed on both the buccal and lingual sides of the teeth. It is a very helpful technique for simultaneously derotating teeth and closing space or derotating multiple teeth. The chicane is very versatile and can be used in a number of different clinical situations.
Tools: Needle nose hemostat and ligature director with a small head
Ligature material: Thin steel ligature 0.008” diameter and two inches in length
When to use it: Use this tie to prevent tipping when you are retracting canines or doing en-masse retraction. For maximum control, the wire needs to be guided close to the bracket body.
Technique: Make a u-shape under the hook on both sides of the bracket body going under the wire. Take one side, go over the wire and under the hook and close it on the opposite side by twisting. Push the sides of the steel ligature as close to the bracket body as possible and tighten to maximize the seating force.
Tools: Hemostat/Mosquito pliers with a thin head, cotton pliers, ligature director with a small head
Ligature material: Clear powerchain
When to use it: Derotation
Technique: Detrotate teeth by wrapping clear powerchain around the tooth, attaching to the wire and bracket hook.
Tools: Hemostat/Mosquito pliers and ligature director
Ligature material: Clear powerchain
When to use it: When it is not possible to ligate a tooth but it needs to be brought closer to the wire.
Technique: Make a normal tie on the wire using the first module of the chain and then is stretch the second module around the crown of the tooth. The technique is especially helpful when the crowding is so severe that the bracket could not be bonded to the tooth.
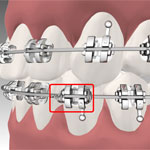
The wings of Incognito brackets are large enough to accommodate both overties and powerchain. Powerchain is easily placed over the existing ties. Recommended powerchain is Rocky Mountain because it is thinner and easier to place on Incognito brackets.
Tools: Hemostat/Mosquito pliers, ligature director, short explorer
Ligature material: Four modules of RMO gray powerchain
When to use it: For angulation and torque control of the anterior teeth when using a ribbonwise archwire with a vertical insertion. The power tie can be used to correct torque and angulation problems with both full sized and under sized wires.
Technique: Remove old elastic and bring the last module of the four modules around the bracket body. It is not necessary to remove the wire to do this. Start to make a reverse double overtie and stretch the elastic as much as possible using a hemostat. Bring both parts of the open module around the side to which the tooth is tipped and go under the hook with both sides. When correcting a torque problem is does not matter which side of the tie wing you go around. Take the short probe and catch the first module. Place the tip of the probe on the occlusal tie wing. Slide the elastic behind the tie wing.
Tools: Ligature director, mirror
Ligature Material: None
When to use it: Use with .014 or smaller Niti wires to resolve crowding on lower anteriors.
Technique: Place wire behind the incisal tie wings and use ligature director to engage.
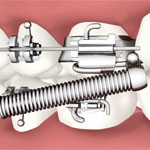
Removal: Module and Push Rod Removal
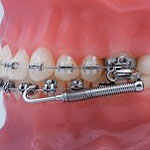
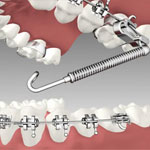
Introduction: Brief overview of the components and function of the Forsus(TM) Class II Corrector
Preparation: The steps required to follow before installing Forsus Class II Correctors in the mouth
Module Installation: Installing the Forsus EZ2 Module or L-Pin Module into a headgear tube
Push Rod Installation: Measuring, installing, and reactivating Forsus Push Rods