


Those Pesky White Spots: Now You See Them, Now You Don’t
 Blog
Blog
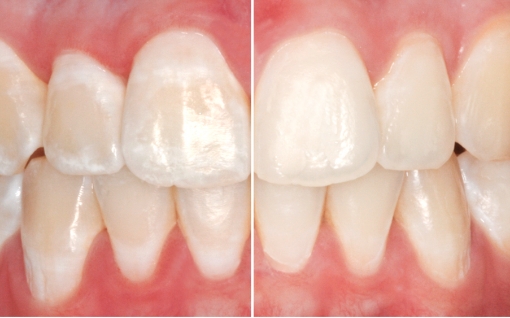
We’ve all seen the white spot lesions on our patient’s teeth. By any measure they’re not particularly aesthetic, and most patients would love for them to disappear. So why is it that most dentists don’t seem to be addressing them? Perhaps they don’t realize that a simple and remarkably effective solution exists: resin infiltration.
Irene Iancu, a Canadian RRDH (Restorative Registered Dental
Hygienist), international speaker, educational content producer, key opinion
leader and owner of a startup dental practice in Toronto, has extensive
experience with resin infiltration. We spoke with her to learn more about using
resin infiltration to address unsightly white spots.
What is resin infiltration?
Resin infiltration is a procedure that uses an unfilled resin to infiltrate white spot lesions, thereby causing the color of the lesion to mimic the color of the rest of the tooth. To the naked eye, that white spot lesion becomes virtually invisible. Resin infiltration can be successfully used to address all types of white spot lesions, from enamel lesions, E1 lesions and D1 lesions all the way to developmental lesions and fluorosis.
It is probably because the procedure is very minimally-invasive – there’s no drilling, mechanical removal of structure or manipulation of the hard tissue other than etching – that it is growing in popularity.
Plus, patients are thrilled with the way that resin infiltration makes their white spots disappear, and are equally excited about how long lasting this solution is.
Although the unfilled resin does not have any real
resistance strength, Ms. Iancu points out that “it also has nowhere to go. It’s
infiltrated into the tooth. It’s not a composite veneer that we’re putting on
the front of the tooth and just fingers crossed hoping that it sticks. So, I
haven’t seen any changes to my patients. I had one yesterday. We took a post-op
photo and it’s been two and a half years and it looks the same as it did on the
first day.”
How do you do a resin infiltration procedure?
Here are the steps that Ms. Iancu recommends for addressing
white spot lesions:
1. Isolate
–
Ms. Iancu prefers a rubber dam. “I’ve seen clinicians not use a rubber dam,”
she reports, “and have a really hard time controlling moisture. And, of course,
that etch tastes horrible. So does the resin, and so does ethanol in its purest
form. So a rubber dam is really important.”
For interproximal lesions, unless you have a great deal of experience with this
procedure, Ms. Iancu strongly recommends that you work on just one surface at a
time. The device that allows you to go interproximal has a little wedge to it,
to separate the teeth. Placing orthodontic separator rings about 15 minutes
prior (or up to a few days prior) can also help provide proper separation.
2. Etch – Comprised
of 15% hydrochloric acid. “Not to be mistaken,” Ms. Iancu clarifies, “with the
phosphoric etch that we use.” Use the etch for two to three minutes, agitating
the etch into the lesion and then rinse. Depending on the lesion’s depth you
may have to do the etching procedure two or three times; this is especially the
case for interproximal lesions.
3. Ethanol
–
Next, use an ethanol solution. This dries out the tooth and the tubules, and
allows you to visualize a white spot lesion.
4. Infiltrate
–
Ms. Iancu recommends Icon from DMG. “The infiltrant itself is then used,”
explains Ms. Iancu, “sometimes for up to 20 or 30 minutes, to allow the tooth
to pull in or suck in that resin. It can go all the way to around 400 microns
if you’re dealing with a lesion that’s quite deep.” For interproximal surfaces,
allow the resin to infiltrate for 5 to 10 minutes, depending on the depth of
the lesion.
5. Remove
excess – “If you’re using the device that’s provided correctly,”
asserts Ms. Iancu, “then you shouldn’t have excess flash. The only time I see
excess flash is if I’ve infiltrated for a long period of time and then the
tooth just has no more space to suck in any of that resin.” In that case you
can use a scalpel blade to remove the excess.
6. Polish
–
For a smooth surface, use your discs to polish. Sometimes Ms. Iancu also uses a
little white stone. On an interproximal surface, take a soft flex disc and
gently polish around the surface.
7. Floss – For
interproximal lesions, be sure to floss.
8. Provide
post-op instructions –To minimize the opportunity for any
internal or intrinsic staining to happen, instruct your patient to stick to a
white diet, avoiding anything that is dark, for the first 48 hours after the
procedure. This is the time frame during which the dental tubules will be open.
The learning curve for this procedure is not steep, and the
basic steps are written on the product’s packaging.
How do you deal with voids and shrinkage in a resin infiltration procedure?
The good news is, neither of these potential problems is an issue here.
Because the Icon infiltrant material is a completely viscous material, you
don’t have to worry about voids. “It’s not a compactable material,” Ms. Iancu
notes. “The tooth is sucking in this liquid resin all on its own without your
assistance. There won’t be any voids.”
What about marginal shrinkage or polymerization shrinkage? “The longer you
infiltrate for, the less opportunity there is for shrinkage,” Ms. Iancu states.
“There’s no physical prep margin, so there’s no cavitation. The beauty of these
lesions is that they’re cavitation free. So, essentially, you should have
virtually no shrinkage at all.”
How can this resin infiltration procedure be a practice builder?
Many patients have been told that there’s nothing to be done about their unsightly white spots. Some have seen providers that tried other techniques that were not successful. When patients realize that there’s an easy, painless, minimally-invasive way to get rid of these white spots, they’re thrilled.
To use this as a practice builder, think in terms of
reaching out to the following:
· Orthodontists – Contact
your local orthodontists, let them know you do this procedure, and share some
of your “before” and “after” cases of white spot lesion management.
· Parents of young children – This
procedure is safe to use to address developmental white spots as early as a
child’s first tooth. Whenever Ms. Iancu’s office completes a successful
treatment on a child she finds that the positive word of mouth leads to
additional patients as well.
· Young adults – A lot of people in their twenties and thirties have lived with white spots for years, often because white spot lesion management was not provided as part of previous orthodontic treatment. For many in this demographic, they are at a point in their lives where they want to do something about it and they are excited to learn that there is a non-invasive solution for their unsightly white spots.
“It’s really changed my practice!” Ms. Iancu exclaims.